FTP in Eclipse — Hooray!

Can’t believe it, just can’t believe! All this while I’ve been finding all kinds of ways to try and work with ColdFusion content on FTP servers, but there is a way built right into Ecplise to connect to an FTP site!

In the past I was pursuaded by colleagues to use Aptana, which caused me other types of grief. Then I used CyberDuck to open files directly in BBEdit and edit them there. At one point I used a couple of other plugins. All these approaches just caused more issues than they solved!

So today, when looking at the different perspectives in Eclipse, I found one called “Remote Filesystem Explorer”! With an intriguing name like that, I thought I’d give it a go and switched to it.

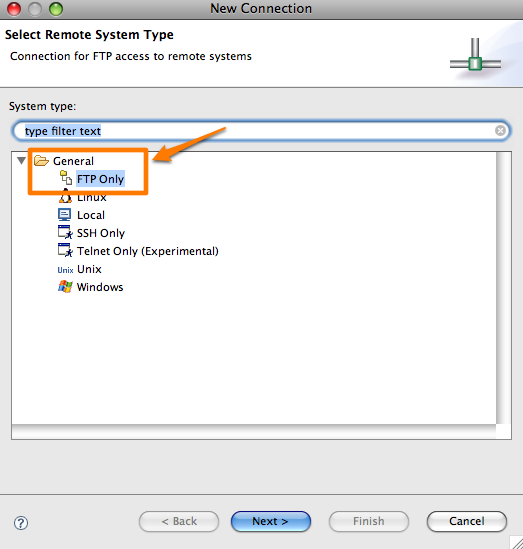
Low-and-behold! Right-clicking the navigator pane promoted me to setup a new connection, and guess what I saw!

Miracle! And it works like a charm and seems very reliable.

BTW, this is on Eclipse 3.4.2.

How do you edit a 862 MB Text File on a Mac?

Right… so I have this large large large text file. 862 MB. And I wanted to change the first few lines in it.

First I tried the usual editors… BBEdit, Coda, TextMate, TextWrangler etc. All crashed and burned.

Then went into Terminal to give the text-based editors a try. And to my amazement (and much joy) the file opened up in both Pico and vi. Although it took 30-odd seconds before the text showed up on the screen, but once it was there, I could scroll around and edit. And saving the file was pretty quick as well.

Long live command line!

SES URLs in MangoBlog on Tomcat

My live blog site runs on ColdFusion (using JRun) with the SES servlet mappings in web.xml. I use the excellent MangoBlog engine for powering my blog. All this means that I have pretty-ish URLs like http://blog.nagpals.com/blog/post.cfm/ftp-in-eclipse-hooray.

Today I wanted to run a copy of my blog on a dev box. But on that dev box, I chose to use JBoss-Tomcat. And the SES servlet mappings that work in ColdFusion on JRun, do NOT work on ColdFusion on Tomcat-JBoss as they are not supported by the servlet engine.

To get around it, I simply used Apache-based rewrites so that the SES urls like http://blog.nagpals.com/blog/post.cfm/ftp-in-eclipse-hooray automatically get mapped to http://blog.nagpals.com/blog/post.cfm?entry=ftp-in-eclipse-hooray.

Here are the rewrites that I put in place to get posts, categories, pages and search to work.

<VirtualHost *:80 >
ServerName nagpals.local
RewriteEngine On
RewriteOptions Inherit
RewriteRule ^/blog/post.cfm/(.*) http://127.0.0.1:8680/blog/post.cfm?entry=$1 [P,L]
RewriteRule ^/blog/page.cfm/(.*) http://127.0.0.1:8680/blog/page.cfm?entry=$1 [P,L]
RewriteRule ^/blog/archives.cfm/search/(.*) http://127.0.0.1:8680/blog/archives.cfm$1 [P,L]
RewriteRule ^/blog/archives.cfm/category/(.*) http://127.0.0.1:8680/blog/archives.cfm?category=$1 [P,L]
RewriteRule ^/(.*) http://127.0.0.1:8680/$1 [P,L]
ProxyPassReverse / http://127.0.0.1:8680/
ProxyPreserveHost on
</VirtualHost>

This would be useful for another reason. If you use MangoBlog on Railo running on JBoss/Resin with Apache in front, you can employ the same trick to get around the whole issue of SES URLs.

Running Railo and Adobe ColdFusion on the Same Context Root in JBoss

To make my applications run both on Railo ColdFusion and Adobe ColdFusion, I needed to make sure that code changes I was making for Railo did not break anything in Adobe CF. Initially, I set up two separate JBoss instances, one running AdobeCF and the other running RailoCF. However, it is a bit of a pain to start two servers, checkout content on both folders, sync files between two directories and so on.

A much nicer way is to get both AdobeCF and RailoCF to run on the same JBoss instance. That is actually not a problem if you can run them in different contexts (e.g., AdobeCF on /adobecf and RailoCF on /railocf). But in my case, I need to run them both on the same context root: /. Getting that to work is slightly more tricky but way more elegant. This is what I did:

Modify Hosts File

First thing, I created two entries in my hosts file (I use Mac). One for a host called railoapp.local and the other called adobeapp.local. Both pointing to 127.0.0.1.

127.0.0.1        railoapp.local
127.0.0.1        adobeapp.local

JBoss Server Instance

Next, created a JBoss (5.0.1) server instance by copying the “web” instance. Named the new instance as cfapps. By default the instance runs on port 8080.

Modify the jbossweb.sar/server.xml to have two more <Host> nodes

<Host name="railoapp.local">
<Alias>railoapp.local</Alias>
</Host>

<Host name="adobeapp.local">
<Alias>adobeapp.local</Alias>
</Host>

Make sure you put the nodes at the correct location.

Modify Apache Conf File

Added directives for the two virtual hosts in the Apache conf file. I normally use mod_proxy as it is fairly easy to configure and extend.

<VirtualHost *:80 >

ServerName railoapp.local
RewriteEngine On
RewriteOptions Inherit
RewriteRule ^/(.*)                    http://127.0.0.1:8080/$1 [P,L]
ProxyPassReverse /                    http://127.0.0.1:8080/
ProxyPreserveHost on
</VirtualHost>

<VirtualHost *:80 >
ServerName adobeapp.local
RewriteEngine On
RewriteOptions Inherit
RewriteRule ^/(.*)                    http://127.0.0.1:8080/$1 [P,L]
ProxyPassReverse /                    http://127.0.0.1:8080/
ProxyPreserveHost on
</VirtualHost>

If you are running JBoss server instance on another port you’d need to change the port number in the rewrite directives.

Restart Apache.

Deploy Adobe ColdFusion WAR

The next thing to do is to deploy ColdFusion WAR file. I have the exploded WAR file and created a folder called cfusion.war in the deploy directory the cfapps JBoss server. In /cfusion.war/WEB-INF, create a file called jboss-web.xml with the following content:

<jboss-web>
<context-root>/</context-root>
<virtual-host>adobeapp.local</virtual-host>
</jboss-web>

Deploy Railo ColdFusion WAR

Now deploy Railo WAR file. I have the
exploded WAR file and created a folder called railo.war in the deploy
directory the cfapps JBoss server. In the /railo.war/WEB-INF, create a file called jboss-web.xml with the following content:

<jboss-web>
<context-root>/</context-root>
<virtual-host>railoapp.local</virtual-host>
</jboss-web>

There is a known issue at the moment that if you deploy Railo as a WAR file, there are some conflicts with a few libraries. To avoid these conflicts, you need to remove the following JAR files from the Railo /railo.war/WEB-INF/lib folder

  • apache-xml-xerces.jar
  • xml-apis.jar
  • ss_css2.jar
  • tagsoup.jar
  • serializer.jar
  • w3c-dom.jar

That should do.

Start the JBoss server and look at the log output. You should see both AdobeCF and RailoCF start in the / context.

Place a file that dumps the server scope in cfusion.war and railo.war folders. Browse to http://railoapp.local/ you should see the server dump for RailoCF. Browsing to http://adobeapp.local/ should show you the server dump for Adobe CF.

Sharing Files Between AdobeCF and RailoCF

Since the basic idea was to make changes in the code and test in both AdobeCF and RailoCF, I checked out my application from source control twice — once into the webroot of cfusion.war and once into the webroot of railo.war. However, this was quite irritating and problemmatic as I has having to commit/checkout/update in two separate folders.

So I decided to remove the source code from cfusion.war and created symbolic links in cfusion.war folder to all the relevant folders in railo.war folder. So when I view the filesystem of cfusion.war I could see the relevant directories in the webroot.

However, JBoss Tomcat by default does not allow browsing to folders and files in symbolic links in the web context.

You need explicity tell it do so. To do this, you need to change jbossweb.sar/context.xml. Add allowLinking=”true” to the root Context node. This is what my Context.xml looks like:

<Context cookies="true" crossContext="true" allowLinking="true">
<Manager pathname="SESSIONS.ser" />
<Manager pathname="" />
<InstanceListener>org.jboss.web.tomcat.security.RunAsListener</InstanceListener>
</Context>

And that did it.

Restart the JBoss server. And now it should expose the linked folders as a regular folders in the webroot and you can browse to them.

It definitely made my development much easier as this setup provides an identical testing ground for my application (both apps running in the root context) and reduces logistical hassels like checking-out/checking-in files at two different locations.
Using BBEdit for Editing Apache Configuration Files

Off late, I’ve been working a lot with Apache configration files. And since I use BBEdit for most of my text file editing, I invariably use BBEdit for editing Apache configuration files. My workflow for working with these files is now quite settled. I thought I’d share it here.

Syntax Color Coding

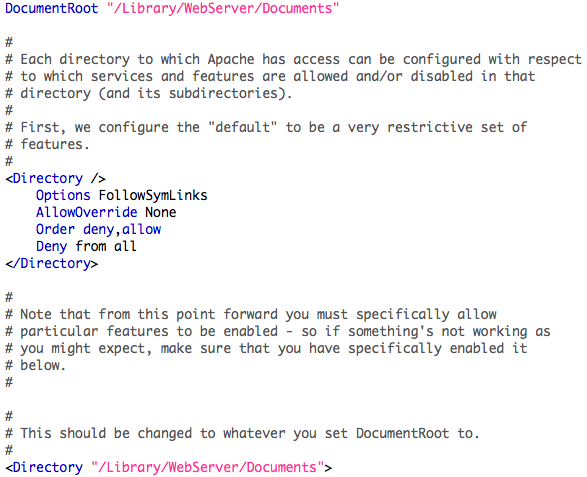
BBEdit has very nice third-party language module for Apache Configuration files. The module automagically provides syntax coloring for all the Apache keywords, making it really easy to read configuration files. If you have ever had to work with Apache configuration files, you will see the utility in something like this. Obviously if you make any error in spelling out a directive or any other keyword, it does not get color-coded, so one ends up making fewer errors.

Apache Configuration Files Color Coding

Editing All Files at One Go

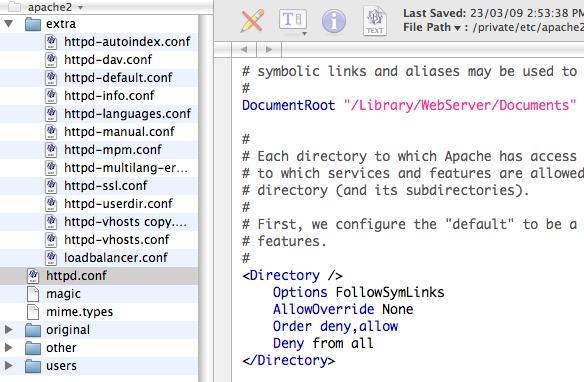
BBEdit has a very feature where one can open up a whole folder for editing. All files in the folder being edited become available on one side of the screen.

Apache File View

This comes in quite handy if you have a lot of include files in your main Apache conf. I have my enviornment setup so that I issue the following on Terminal and BBEdit loads up the folder view for Apache configuration files:

bbedit /private/etc/apache2

Testing Configuration

After making any change to configuration files, I normally test if the changes are ok or not. I’ve created a simple shell script that does the needful.

#!/bin/sh
sudo apachectl -t

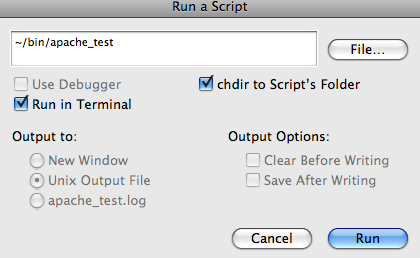
Using BBEdit you can run this script from within BBEdit, without having to open Terminal. You need to click on the top menu option which looks like #! to bring up the menu to run the script.

Restarting Apache

If the test is ok, you can restart Apache. I have another simply shell script that does the needful:

#!/bin/sh
sudo apachectl restart

Again, I run it using the BBEdit option to run scripts in Terminal.

All in all, with the plugin and these simply scripts, my Apache webserver configuration tasks have become much simpler and more streamlined.