Search CFWheels Documentation

CFWheels has excellent documentation. Well organized, sufficiently detailed, well presented.

Something that is missing at the moment, and is on the list of things to-do for the CFWheels team, is to add a search feature to the docs.

Till the time that feature is implemented, I created a Google custom search for CFWheels docs.

I just find that after one has understood the basics and has started building an application, there is a need to be able to quickly search for information rather than go through listing of topics to figure out where can one find a piece of information.

To that end, a search interface proves very useful.

So, if you want to search CFWheels documentation till the time a formal search is put on the site, you are more than welcome to use the custom search that I use.

You can access the search at: http://blog.nagpals.com/utils/cfwheels/search/

Or use the search box below to search:

Loading

Life after Subversion — Mercurial!

A note to myself: The only constant in life, Indy, is change!

I’ve been using Subversion for version control for a couple of years now. It was quite a change moving from Microsoft Visual Source to Subversion. A different mind set. A different way of doing things.

And then I read about Mercurial today.

Mercurial is one of the new breed of version control systems.

Its major goals include high performance and scalability; serverless, fully distributed collaborative development; robust handling of both plain text and binary files; and advanced branching and merging capabilities, while remaining conceptually simple. It includes an integrated web interface. (Wikipedia)

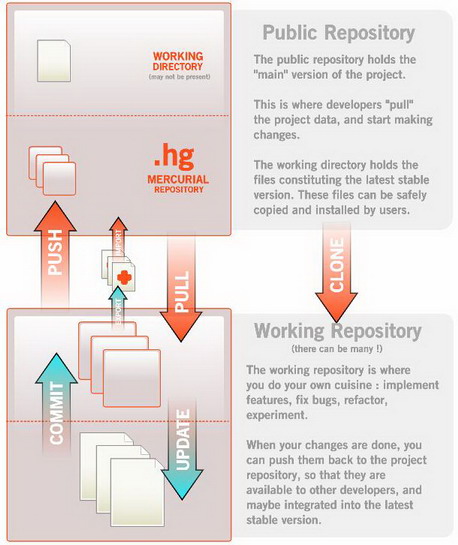
Basically Mercurial moves away from the paradigm of working with centralized repositories (like CVS and SVN) to support distributed, collaborative development. And at the same time trying to be a simple-to-use system (a big challenge!).

There is a great little article on JavaWorld comparing different version control systems. It is quite enlightening: Subversion or CVS, Bazaar or Mercurial?

The article explains in simple words what Mercurial is on page 4.

Mercurial is newer open source version control system based on the distributed model. In Mercurial, as in Subversion or CVS, developers work on a local working directory. However, unlike centralized solutions, Mercurial also stores a copy of the entire project history on each developer’s machine. In this way, developers can work in parallel, even without a network connection.

Unlike Subversion, however, when you commit changes in Mercurial, you only create a new revision in your local repository (which, given Mercurial is based a distributed model, is considered to be just as good a repository as anyone else’s).�

Seems like an intriguing concept. I’ve been going through the documentation on Mercurial site and it seems to be very well documented.

In terms of companies/projects actually using Mercurial, Sun Microsystems software (including Open Solaris and NetBeans) and Mozilla are using it to manage open-source initiatives. These are project where the need for distributed collaborative version control is quite high.

Well… it’s time to give it a try!

Running Apache Solr on JBoss

Off late, I’ve been doing a lot of development with Railo running on JBoss. So naturally, I wanted to plug in Apache Solr (which now ships with ColdFusion 9) into my JBoss instance running Railo.

What I thought would be straight-forward took a bit to figure out. The issue comes when you have to setup the solr.home property. The Apache Solr wiki suggests putting an <env-entry> node in the web.xml. However, if you do that, the XML does not validate as “-//Sun Microsystems, Inc.//DTD Web Application 2.3//EN”. JBoss 5 is a little particular about web.xml validating properly — which is a good thing!

So the trick to declare Solr home variable is to do this:

Add the following to conf/jboss-service.xml

<!-- For Apache Solr -->
<mbean code="org.jboss.naming.JNDIBindingServiceMgr" name="jboss.tests:service=JNDIBindingServiceMgr">
      <attribute name="BindingsConfig" serialDataType="jbxb">
         <jndi:bindings xmlns:xs="http://www.w3.org/2001/XMLSchema-instance" xmlns:jndi="urn:jboss:jndi-binding-service:1.0" xs:schemaLocation="urn:jboss:jndi-binding-service:1.0resource:jndi-binding-service_1_0.xsd">
            <jndi:binding name="solr/home">
                <jndi:value type="java.lang.String">FILESYSTEM_PATH_TO_SOLR_HOME</jndi:value>
            </jndi:binding>
         </jndi:bindings>
      </attribute>
 </mbean>

Replace FILESYSTEM_PATH_TO_SOLR_HOME in the above node to the actual physical filesystem path where Solr home for your application lives, e.g., in my case it was: /Users/indy/solr/

Add the following node to the application specific WEB-INF/web.xml:

<resource-env-ref>
     <resource-env-ref-name>solr/home</resource-env-ref-name>
     <resource-env-ref-type>java.lang.String</resource-env-ref-type>
</resource-env-ref>

And finally create a WEB-INF/jboss-web.xml file (if it already does not exist for your web application) and add the following content to it:

<jboss-web>
	<context-root>solr</context-root>
	<resource-env-ref>
		<resource-env-ref-name>solr/home</resource-env-ref-name>
		<jndi-name>/solr/home</jndi-name>
	</resource-env-ref>
</jboss-web>

Once done, browse to your app: http://yourserver:port/solr/ and you should see Apache Solr running. Obviously you need to make sure that the Solr home directory contains the appropriate XML descriptors for Solr configuration.

‘Agile’ Integration Tests on Grails

Over the weekend I finally scrounged some mental space to write a small application to manage bookings for my badminton club. After debating between Ruby on Rails (RoR) and Grails, I decided on Grails.

As you might know Grails has very nice and expressive way of modeling the domain classes — arguably more elegant than RoR. And also that writing integration tests to experiment with the CRUD functionality makes writing a robust and testable model very simple.

So I wrote a bunch of integration tests as I was designing the domain classes. However, running the tests using grails test-app was proving to be very slow, and I mean really slow — 11 seconds to run tests on two domain classes.

Using grails test-app runs both unit and integration test. The actual time taken to run both the unit and integration tests wasn’t that much. It was the overall task of setting up the test environment that seemed to be taking a while.

So I experimented with a couple of options. You can chose to run only the unit or integration tests:

grails test-app -unit

grails test-app -integration

It is nicer in that one can run either unit or integration tests, but it still is quite time consuming as far as integration tests go.

To make a little more efficient, you can also just run integration tests on one class at a time:

grails test-app -integration className

This runs integration tests for only the class whose className is provided.

More information on this can be found in the Grails documentation.

Quicker, but still not fast enough to be called “agile”!

The final thing to try was to run the interactive Grails interactive shell:

grails interactive

This launches the Grails interactive shell in which you can issue various commands. So to test an app:

test-app

This takes a little while to setup the test environment etc., but once it is done, the next time you run test-app, Grails only takes the time to run actual tests, which is much faster and ‘agile’!

Coda Snippets for ColdFusion, MXUnit and ShadoCMS

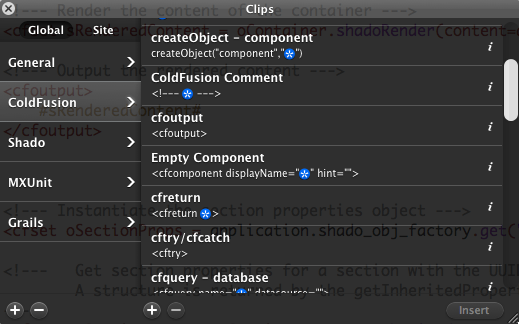
If you’ve been following my blog, you might have seen that I’ve started using this wonderful editor called Coda for most of the development work I do. It has very nice built-in support for ColdFusion and given that it is a native Mac app, the interface is beautiful. And it has a few really nice features like built-in FTP and Clips (snippets).

Over the last month or so, I’ve built up quite a few clips, which are just snippets in CFEclipse-speak, for ColdFusion, MXUnit and ShadoCMS. Obviously I’m adding more as I find time or as I need, but here is what I have managed to put together till now.

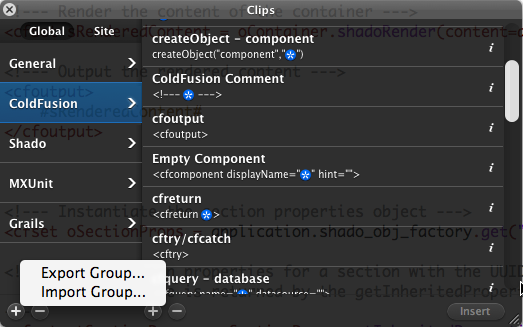
To install, simply download and double-click the file. It should automatically become available in the Clips area. Or you can open the Clips window and right click on the left side of the Clips window:

Also, I’ve set up keyboard triggers for most of the clips. You might want to change them to what you like.

Have fun!

PS: My initial ColdFusion clips started off with this comment on a previous blog entry.