Closures in ColdFusion: Structures/Collections

Railo 4 supports closures (a.k.a. anonymous functions) in ColdFusion.

I’ve been playing with the different ways of using them in the various apps I am building at Straker Translations.

Today there was a need to loop over the keys of a structure (a.k.a. associative arrays) and add the value of all the keys.

The usual idiom of regular ColdFusion code would be to use <cfloop> to go over all the keys and do the addition.

With Railo closures it is much simpler. Here is the code:

It is simple and elegant. Makes the code much more succinct and powerful.

Alfred, Search Railo Wiki Using Google Please

Looks like the Railo team have been slowly migrating documentation on the various tags across from the old wiki to Github wiki. If you are like me, and like to refer to documentation every now and then, it is a bit pain to search for a particular function or tag in the Github wiki.

Google and Alfred come to rescue.

Suppose you want to see documentation on the cfcontent tag, first you get Google to do the hard work for you by entring the following in the search bar of your browser:

http://www.google.com/search?q=cfcontent&as_sitesearch=github.com%2Fgetrailo%2Frailo%2Fwiki%2F&q=cfcontent+site:github.com%2Fgetrailo%2Frailo%2Fwiki%2F

As you can see you can specify the URL to search (which is the Railo Github wiki) and query as ‘cfcontent’.

As you want to search for different terms you can substitute ‘cfcontent’ with the name of the ColdFusion function/tag you want more information on.

But it soon gets a pain in the neck as you have manually hack the URL each time.

That is where Alfred comes in very handy.

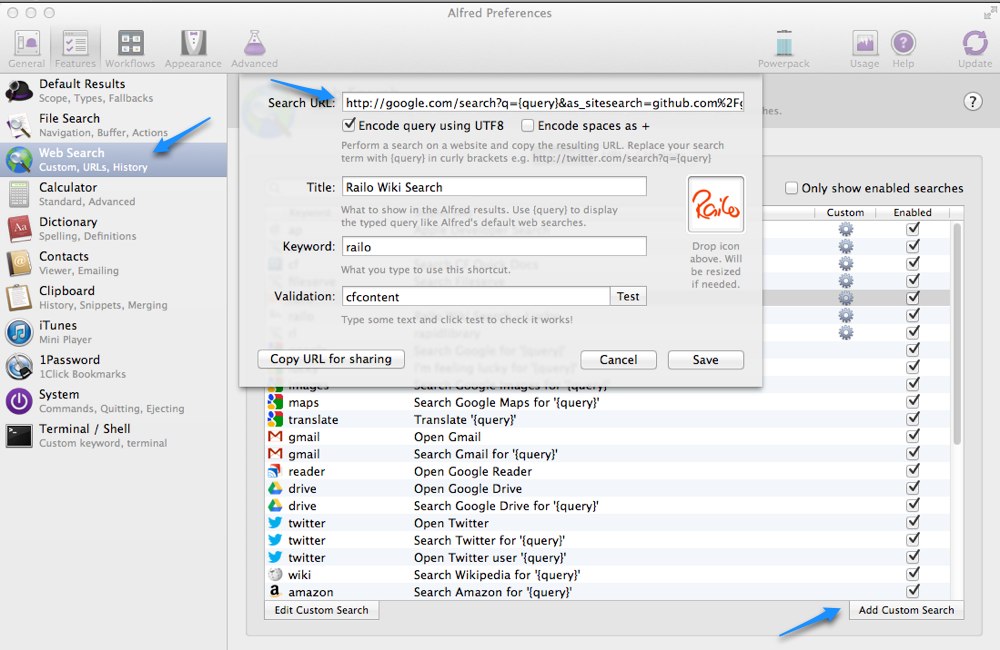
Create a Custom Search (in Preferences > Web Search). Use the following URL, and test.

http://google.com/search?q={query}&as_sitesearch=github.com%2Fgetrailo%2Frailo%2Fwiki%2F

Give the keyword ‘railo’ or whatever suits your fancy.

Custom Railo Wiki Search

To make this even better, you can use use the “I’m Feeling Lucky” functionality of Google Search to directly take you to the first page of the search results. You can create another custom search in Alfred using the following URL.http://www.google.com/search?btnI=I%27m+Feeling+Lucky&ie=UTF-8&oe=UTF-8&q={query}&as_sitesearch=github.com%2Fgetrailo%2Frailo%2Fwiki%2F

Now, whenever you launch Alfred, and use the keyword ‘railo’ or whatever you set up, you can type the name of the ColdFusion tag/function after they keyword, and it will open up the search results from Railo Github wiki in your browser!

If you use another program like Alfred, the same URLs can be used in the format that suits those programs.

The Joy of Sublime

A couple of years back, after using Eclipse as the IDE of my choice, I switched to Coda. It was really nice to be able to work in a native Mac app. It was quick, responsive and beautiful. However, every so often I used to feel little disgruntled with how it is a little difficult to extend, especially, when it comes to snippets and setting up other workflows. I still love Coda, but I’ve been flirting with TextMate, BBEdit, even MacVim on the side. TextMate came close, but it has its own quirks.

A couple of days back I came across Sublime Text 2. Its tag line says: “The text editor you will fall in love with”. And it is true! I’m in love with it.

There are quite a few things that like about it:

  • Extremely Responsive: Extremely quick once it starts up. Startup time is ok, but once it is up and running, it is blazing fast.
  • Great sidebar: The sidebar where files and folders are displayed is very nicely done. It is simple — you can simply drag a folder from your filesystem there and it becomes available for navigation and file editing. Plus you can open bespoke files, which show up in a file list. Coda doesn’t have something like this, but TextMate does. But Sublime does it better. The only thing the sidebar lacks at the moment, is the ability to rename/add/delete files. But that is not something I do too often. Anyway, it is the most requested feature. So I’m sure it’ll be added soon.
  • View file content without opening: Once you click a file in the sidebar, the contents of the file are display, without actually opening the file. That is pretty useful!
  • Compatibility with TextMate: The language files and snippets from TextMate can be used pretty easily. And that means that a whole bunch of existing syntax/snippets can be used straightaway. Complete TextMate bundles are not supported however. You need to extract the snippets and language files.
  • No need to reload: Customizing the snippets and language files and color schemes is a simple matter of opening them in Sublime (they are in XML format), and editing them. As you save them, they are reloaded. No need to “Reload Bundle”!
  • Key Bindings and Preferences: The key bindings are completely, and easily, customizable. And so are the Options. They are stored in JSON format in a couple of files. Simply open, and change away. Again, no need to reload, they become available straightaway as you save.
  • Useful find and select: The ability to find is very, very nice. You can easily find a word, symbol, file. Search and replace is very nice as well. There is an extremely useful “Goto Anything” option. A gem!
  • Map of the file: You can see a little map of the file you are working on. If it is a long file, you can see exactly where you are in the file. Very handy. If you search for terms, you can even see them highlighted in the map. Very cool.
  • Decent Forum: The forum for Sublime Text has a lot of discussion, and is pretty active. I posted a few questions, and with the exception of one, all were answered satisfactorily very quickly.
  • Full Screen: A very useful Full Screen mode. Switch to it, and no distractions!
  • Cross Platform: Works on Windows, Mac and Linux. I’ve only tried the Mac version. But I believe the Windows version works well as well.
  • Portable: Apparently one can run it off a USB key. Which is great. But I haven’t tried that as yet.

The latest stable version is 1.4. But I’m using Sublime Text 2 — which is in alpha, but very stable. Except for one minor issue, I am pretty happy with the overall experience.

The documentation for Sublime Text 2 is still under development. The basic usage is pretty straightforward. But if want to extend it, forums are the best way to get going. But it’d be good to see more complete documentation soon.

I think it is an editor that is worth a try. I’ve already switch the associations on my system to open text files in Sublime!

Would like to hear what you think about it.

PS: I am using Sublime for a ColdFusion project. So I customized the TextMate snippets and language file to work with Sublime — a ColdFusion plugin for Sublime Text 2 so to speak..

Create Custom Dictionaries For Mac OSX

Over the last couple of months I’ve been chipping away at creating an add-on dictionary for the Dictionary application on Mac. I wanted to create a dictionary for CFWheels.

Information on how to create such dictionaries was not all that easy to find. So I thought I’d share what I found in case it helps some else.

Apple’s Dictionary Services Programming Tutorial

First up, have a look at this tutorial on Dictionary Services Programming over at developer.apple.com. It provides all the information one needs to get started. You can also download a PDF of this tutorial.

Template Files for Dictionary

One thing that the tutorial assumes is that you have the template files for dictionary development are. First challenge was to figure out where they were. I found that they are installed with XCode at: /Developer/Examples/Dictionary Development Kit. If you don’t have XCode installed, then you can download the this zip file that contains the Dictionary Development Kit.

The Make Command

Before you customize anything in these files, simply run ‘make’ command in directory where you unzip these files. It should create a dictionary called “My Dictionary”. If you move this dictionary to /Library/Dictionaries or ~/Library/Dictionaries, it will start showing up i the Dictionary app.

There are a couple of other things that the make command can do:

  • make clean : cleans older builds
  • make install : installs the created dictionary to ~/Library/Dictionaries folder
  • make : creates the dictionary

Change the XML and Info.plist

Now add the stuff you want in the XML that will be used to create the dictionary. You will have to generate the XML with the appropriate structure and content. Also modify the plist file as required. Run “make” to create your dictionary.

A Big Gotcha – Cached Dictionaries

On thing that really had me flummoxed was that despite making a new dictionary, the Dictionary app was not reliably showing all the changes I expected.

This took a while to figure. There is a bunch of caching that comes into play if you are creating new builds of the dictionary. Cached versions show up and throw you off the track.

So I had to write this shell script to clean Dictionary app cache. Make sure that you

  • make the script executable before running it, and
  • quit the Dictionary app before you run

I found that I had run this each time I made a change to the XML file.

A downside to doing this is that it resets all Dictionary preferences. So when you start the Dictionary app after running this script, you have go to Preferences and turn on the dictionary you are working on. A bit painful, but not such a biggie.

My Development Workflow

So as I was making changes to the XML file with data, I was running the following commands:

  • ./clean.sh (cleans out all dictionary caches)
  • make clean (cleans out older builds of the dictionary)
  • make (makes the dictionary)
  • make install (installs the dictionary)

Example Dictionary: CFWheels

If you want to see an example of the dictionary that I created, check out: https://github.com/indynagpal/CFWheels-Mac-Dictionary

Look at the XML and Info.plist files.

That’s it… go and have fun creating dictionaries now!